Managing Identity Providers
Article Type: Configuration / How-To Audience: Enterprise Administrators Module: Access Control Applies to Versions: All Versions Estimated Time: 30-45 minutes
Identity Providers control how users authenticate to the Fuuz platform. Enterprise Administrators configure Identity Providers to enable internal password-based authentication, Single Sign-On via OpenID Connect, or basic API authentication for specialized integration scenarios.
1. Overview
Each Enterprise User is assigned to one Identity Provider, which determines their authentication method, password policies, multi-factor authentication settings, and IP-based access restrictions.
Note: Before you begin, determine your authentication strategy. Most organizations use the Internal Identity Provider for shop floor and warehouse users without corporate directory accounts, and OpenID Connect SSO for office users with existing Azure AD, Google Workspace, or Okta accounts. Basic API Access is reserved for specialized API integrations where standard API Key length exceeds external system limits.
Identity Provider Types
| Type | Use Case | Authentication Method |
|---|---|---|
| Internal | Non-directory users (shop floor, warehouse, contractors) | Fuuz-managed passwords; frontend and API access |
| OpenID Connect SSO | Corporate directory users with existing SSO provider | External identity platform; frontend and API access |
| Basic API Access | API integration when API Key length exceeds external limits | Username/password basic auth; API access only (no frontend) |
Key Concepts
- Default Identity Provider: Automatically selected when creating new users; can be overridden during user creation
- One IdP Per User: Each Enterprise User is assigned to exactly one Identity Provider
- IP Restrictions: Applied at IdP level; all users of that IdP inherit IP whitelist restrictions
- Cost Optimization: Internal IdP avoids per-user licensing costs of corporate SSO providers for non-directory users
- Frontend vs API Access: Internal and OIDC users can access both frontend and API; Basic API Access users are API-only
Common OIDC-Compatible Providers
- Microsoft Azure AD / Entra ID: Enterprise directory and identity management
- Google Workspace: Google's enterprise identity platform
- Okta: Dedicated identity and access management platform
- Auth0: Developer-focused identity platform
- Keycloak: Open-source identity and access management
- Ping Identity: Enterprise identity platform
- AWS Cognito: Amazon's managed authentication service
- OneLogin: Cloud-based identity management
2. Prerequisites
- Access Level: Enterprise Administrator with Enterprise Admin Home access
- Permissions: Access Control management permissions
- Resources: For OIDC providers, administrative access to external identity platform (Azure AD, Okta, etc.)
Important: Set up Identity Providers BEFORE creating Enterprise Users. Converting users between Identity Providers requires manual reassignment and may cause authentication complications.
3. Procedure Steps
Step 1: Configuring Internal Identity Provider
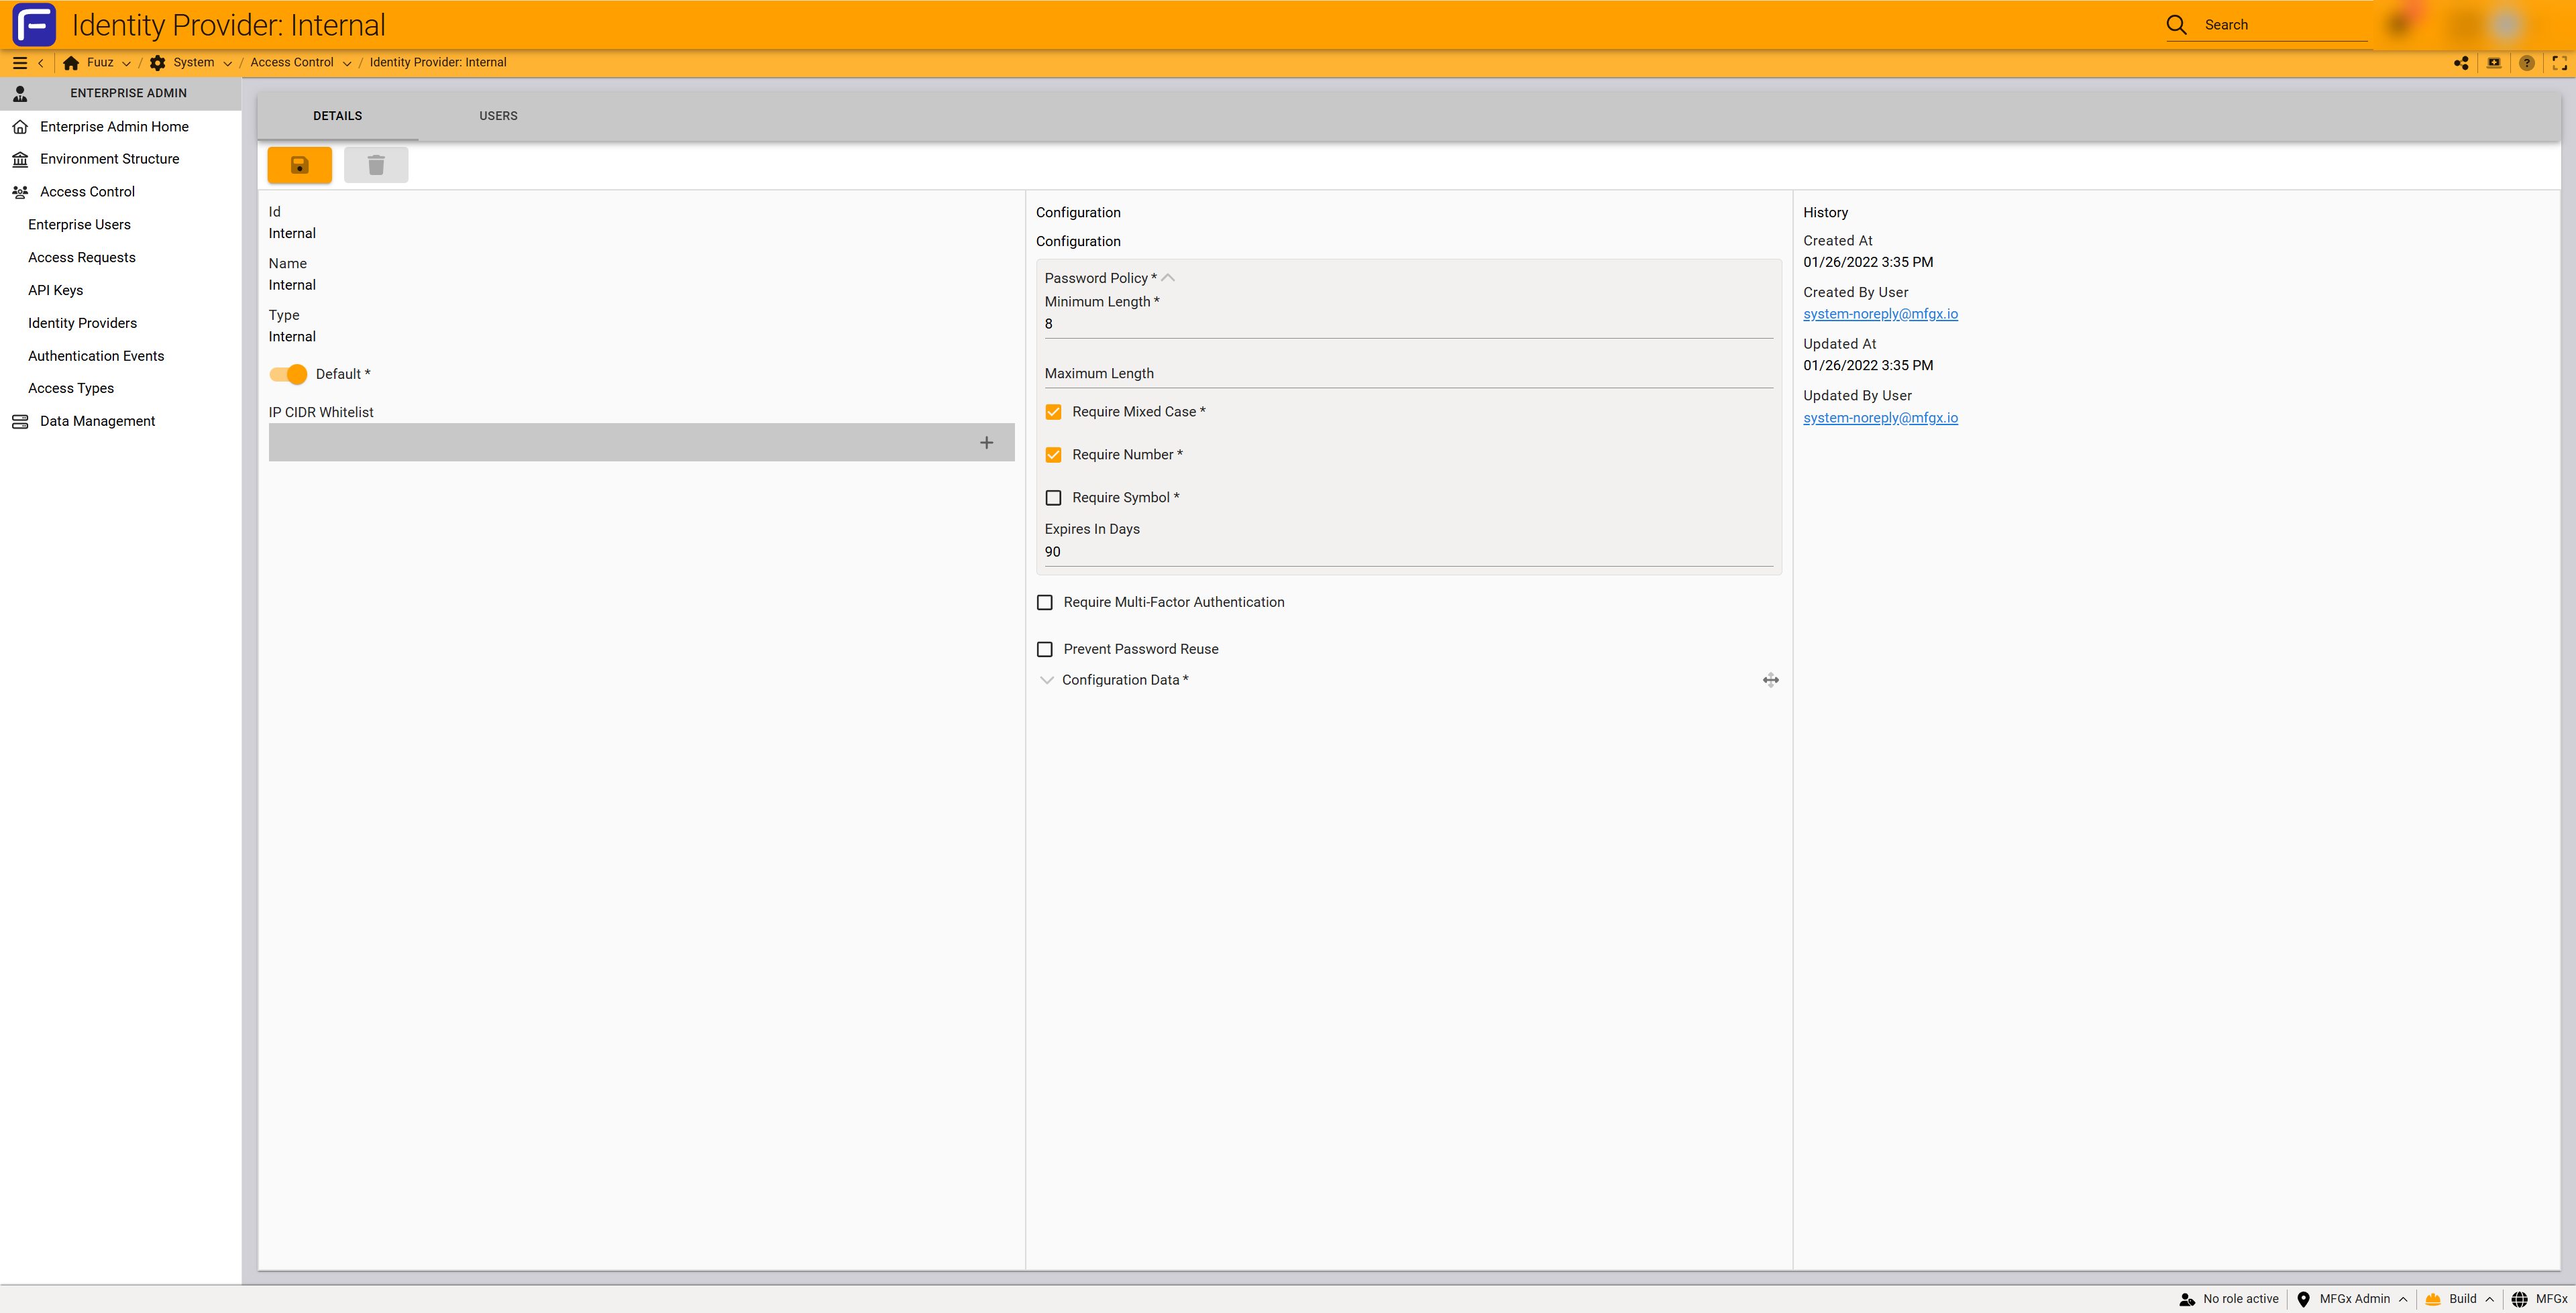
The Internal Identity Provider is pre-configured by default. Customize password policies and security settings as needed.
- Navigate to
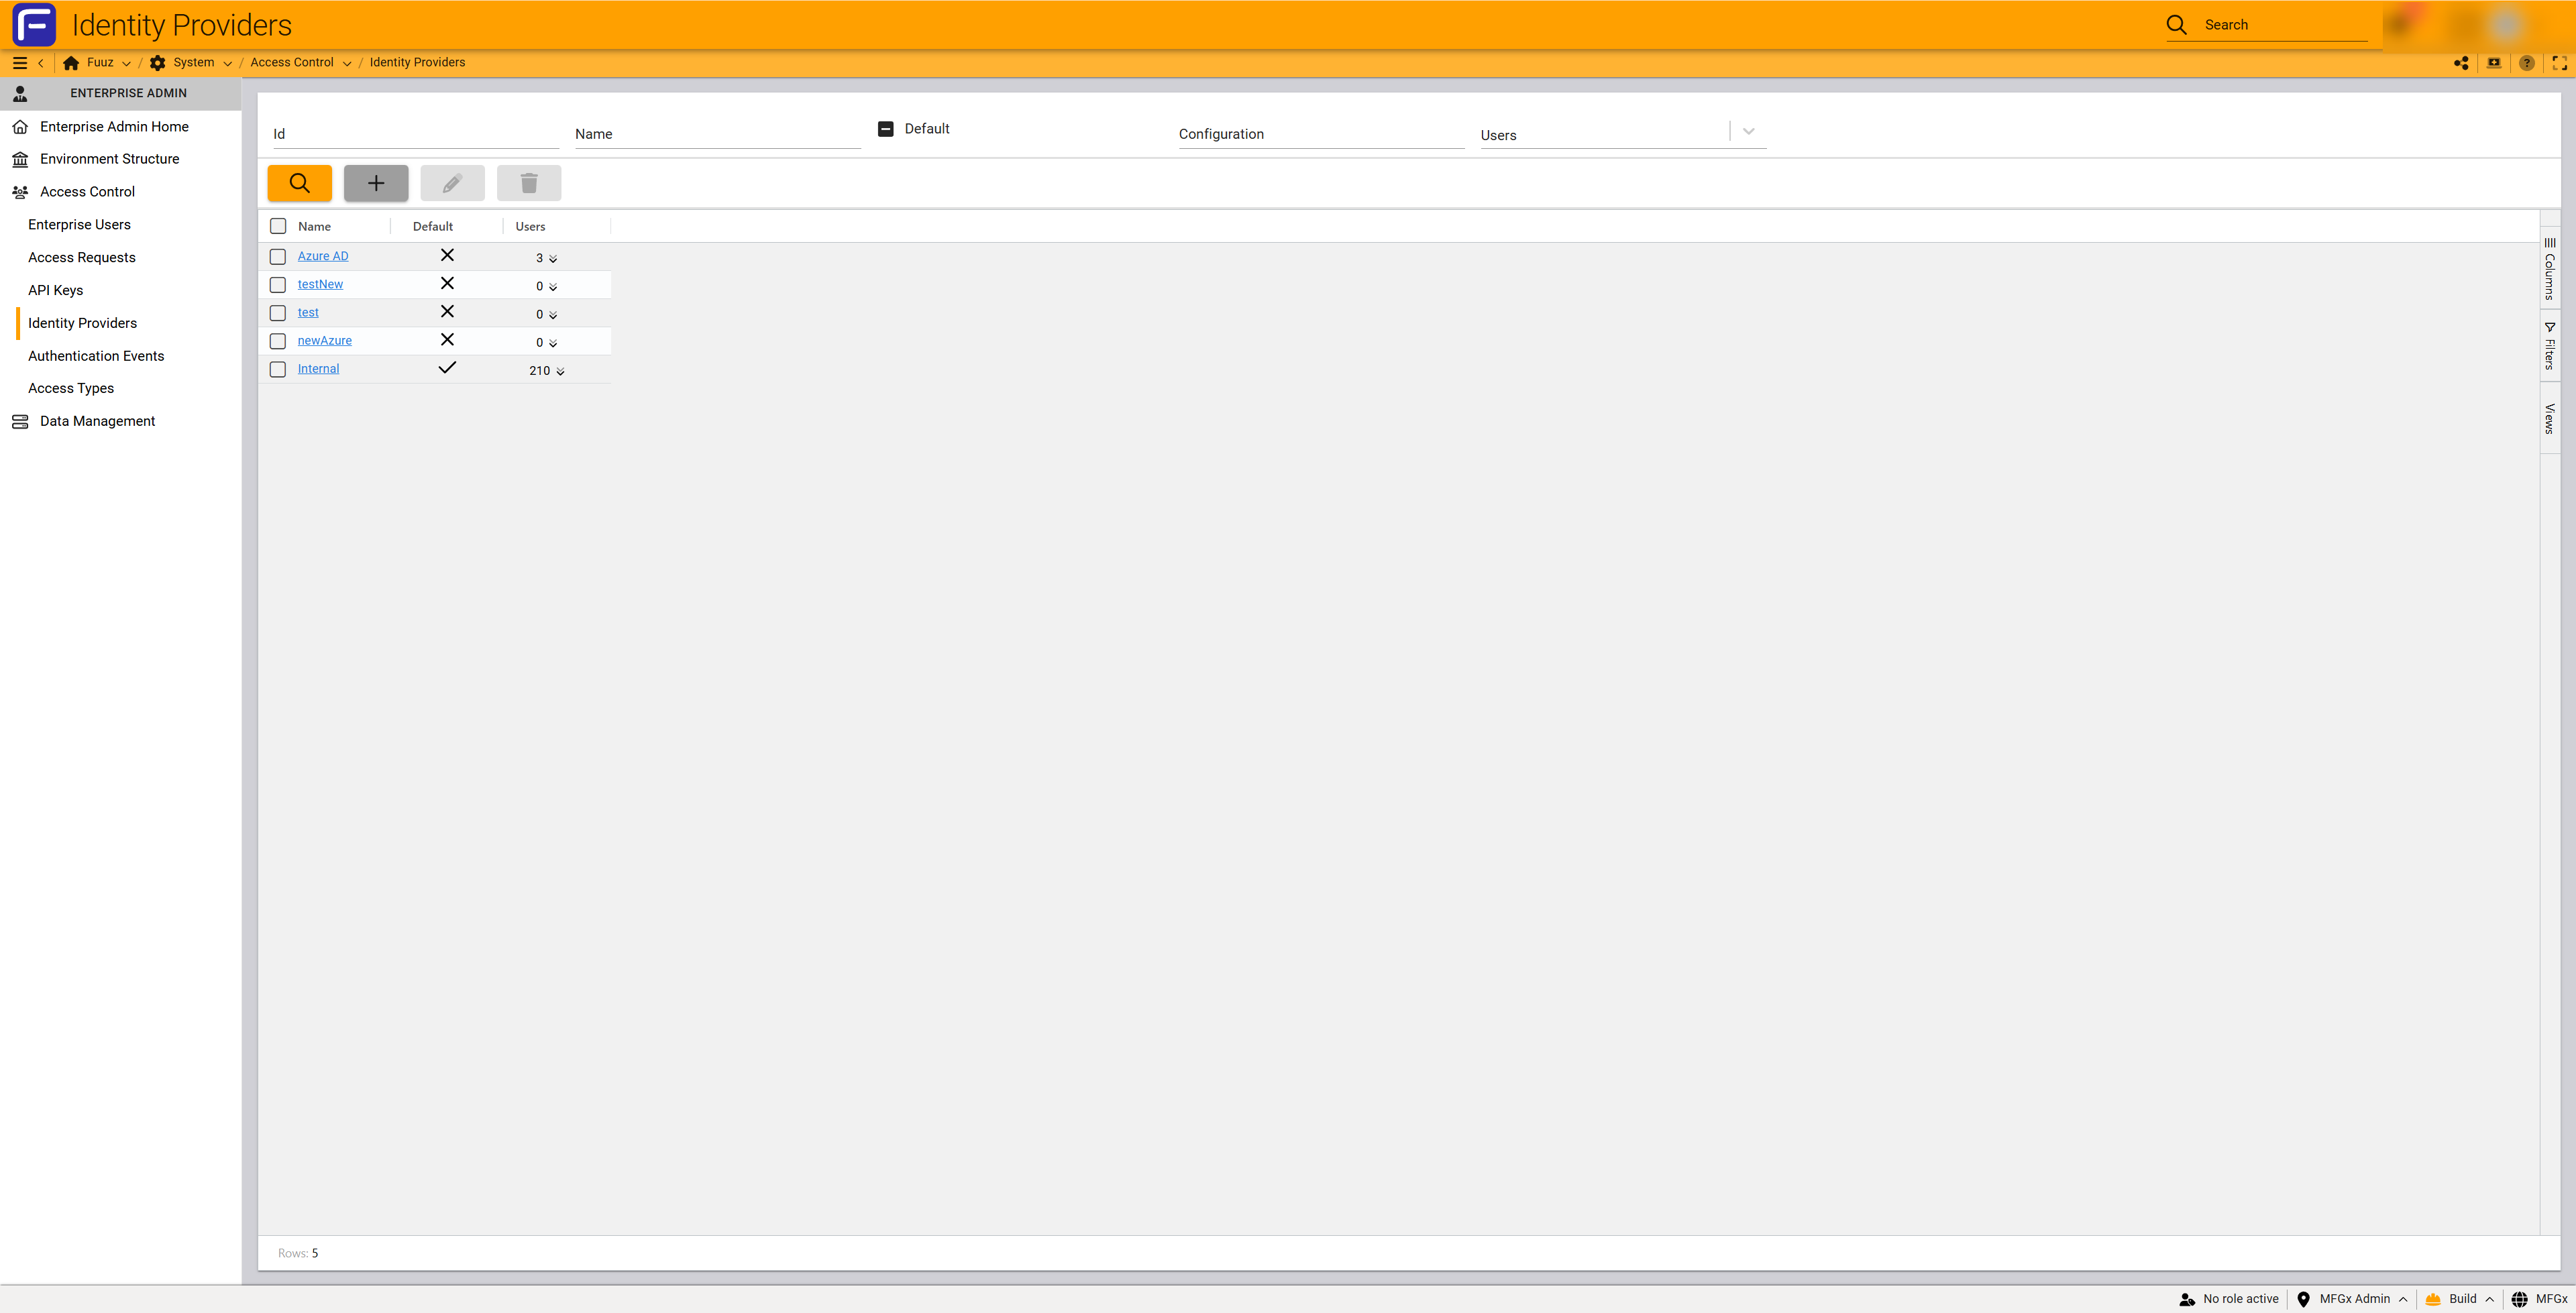
Enterprise Admin → Access Control → Identity Providers - Select the Internal provider by clicking the Id field
- Review the left panel Basic Information
- Configure the middle panel Configuration section:
- Verify Default checkbox status (should have one default IdP)
- IP CIDR Whitelist: Add IP addresses or CIDR blocks to restrict login access (optional)
- Minimum Length: Default 8 characters
- Maximum Length: Default unlimited
- Require Mixed Case: Force uppercase and lowercase characters
- Require Number: Force at least one numeric character
- Require Symbol: Force special characters
- Expires In Days: Default 90 days; 0 = never expires
- Require Multi-Factor Authentication: Enable Email or Mobile App 2FA
- Prevent Password Reuse: Block reusing recent passwords
- Review the right panel History section showing creation and modification audit trail
- Save changes
Important: When passwords expire, users are locked out immediately. Enterprise Administrators must manually reset the password. Users receive advance email notifications before expiration.

Step 2: Configuring OpenID Connect SSO Provider
Configure Single Sign-On using OpenID Connect for corporate directory users.
Part A: Configure OIDC Application in External Identity Platform
Follow your SSO provider's documentation to create an OIDC application. Example for Azure Entra ID (https://entra.microsoft.com/):
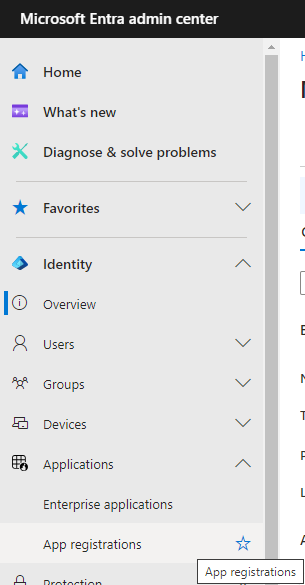
- Navigate to Azure Entra ID admin center
- Under Applications, select App Registrations
- Click New registration
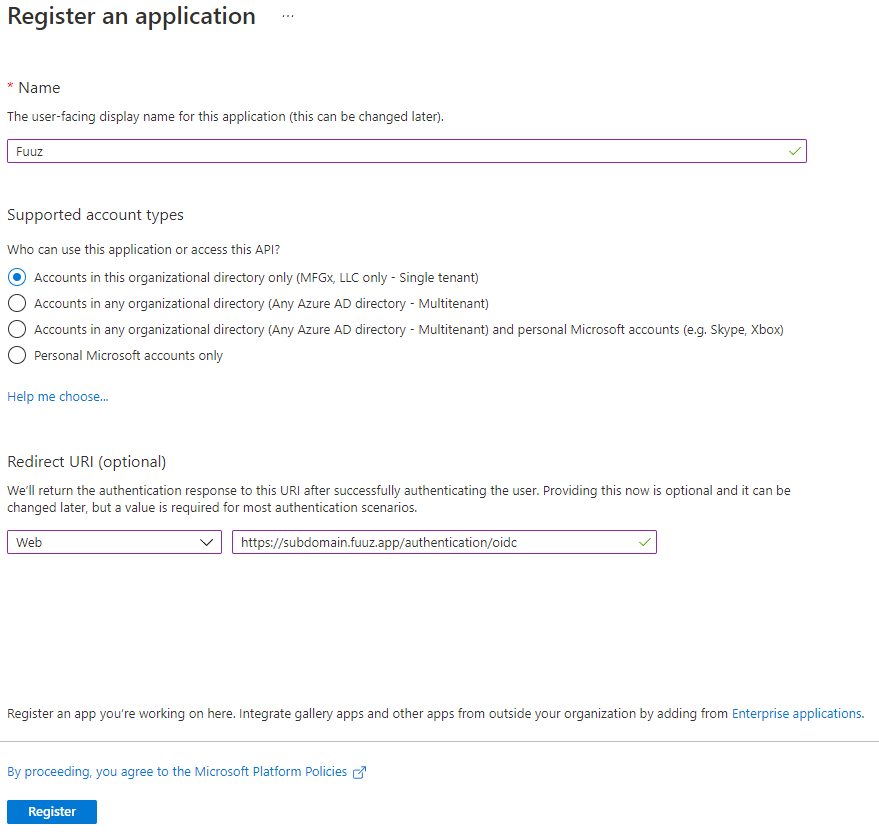
- Enter application details:
- Name: Fuuz
- Supported account types: Accounts in this organizational directory only
- Redirect URI: Platform: Web, URL:
https://[EnterpriseID].fuuz.app/authentication/oidc - For non-production:
https://[Environment].[EnterpriseID].fuuz.app/authentication/oidc
- Click Register
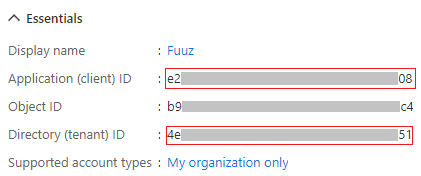
- Copy and save:
- Application (client) ID
- Directory (tenant) ID
- Optional: Configure sign-in branding on Branding & Properties page
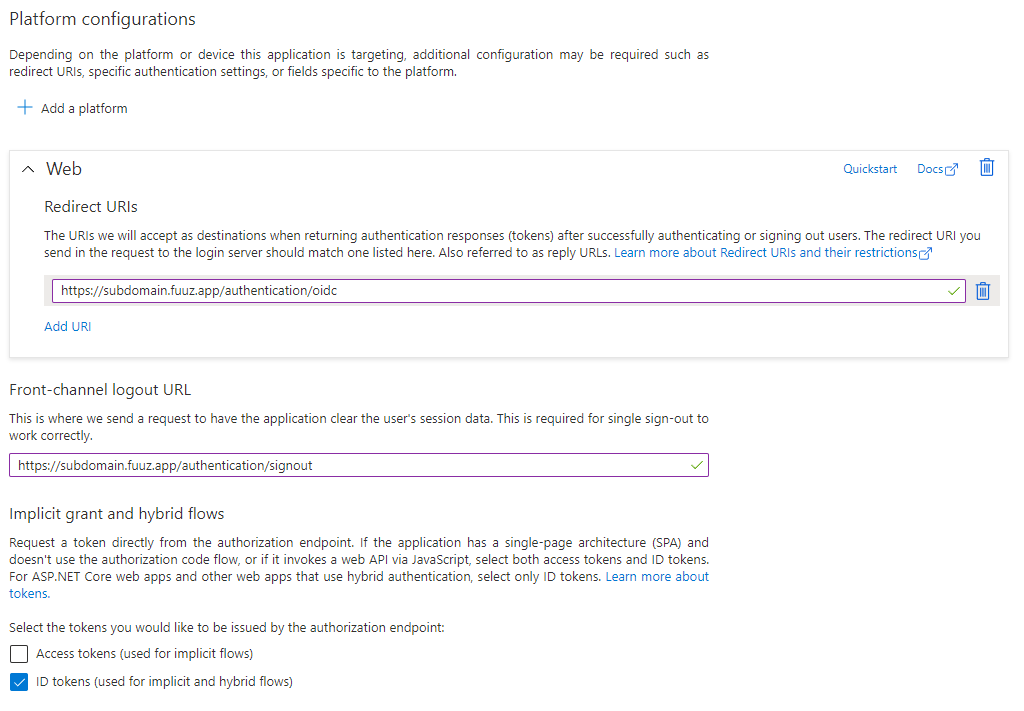
- Switch to Authentication page:
- Optional: Add front-channel logout URL:
https://[EnterpriseID].fuuz.app/authentication/signout - Under Implicit grant and hybrid flows, check ID Tokens box
- Click Save
- Optional: Add front-channel logout URL:
Part B: Create OIDC Identity Provider in Fuuz
- Navigate to
Enterprise Admin → Access Control → Identity Providers - Click + (Add) button
- Complete the Create a new Identity Provider form:
- Name: Descriptive name (e.g., "Azure Entra ID", "Okta SSO")
- Default: Check if this should be default for new users
- Identity Provider Type: Select OpenID Connect SSO
- IP CIDR Whitelist: Add IP restrictions if needed (optional)
- Click + (Submit)
- Navigate to the newly created provider by clicking the Id field
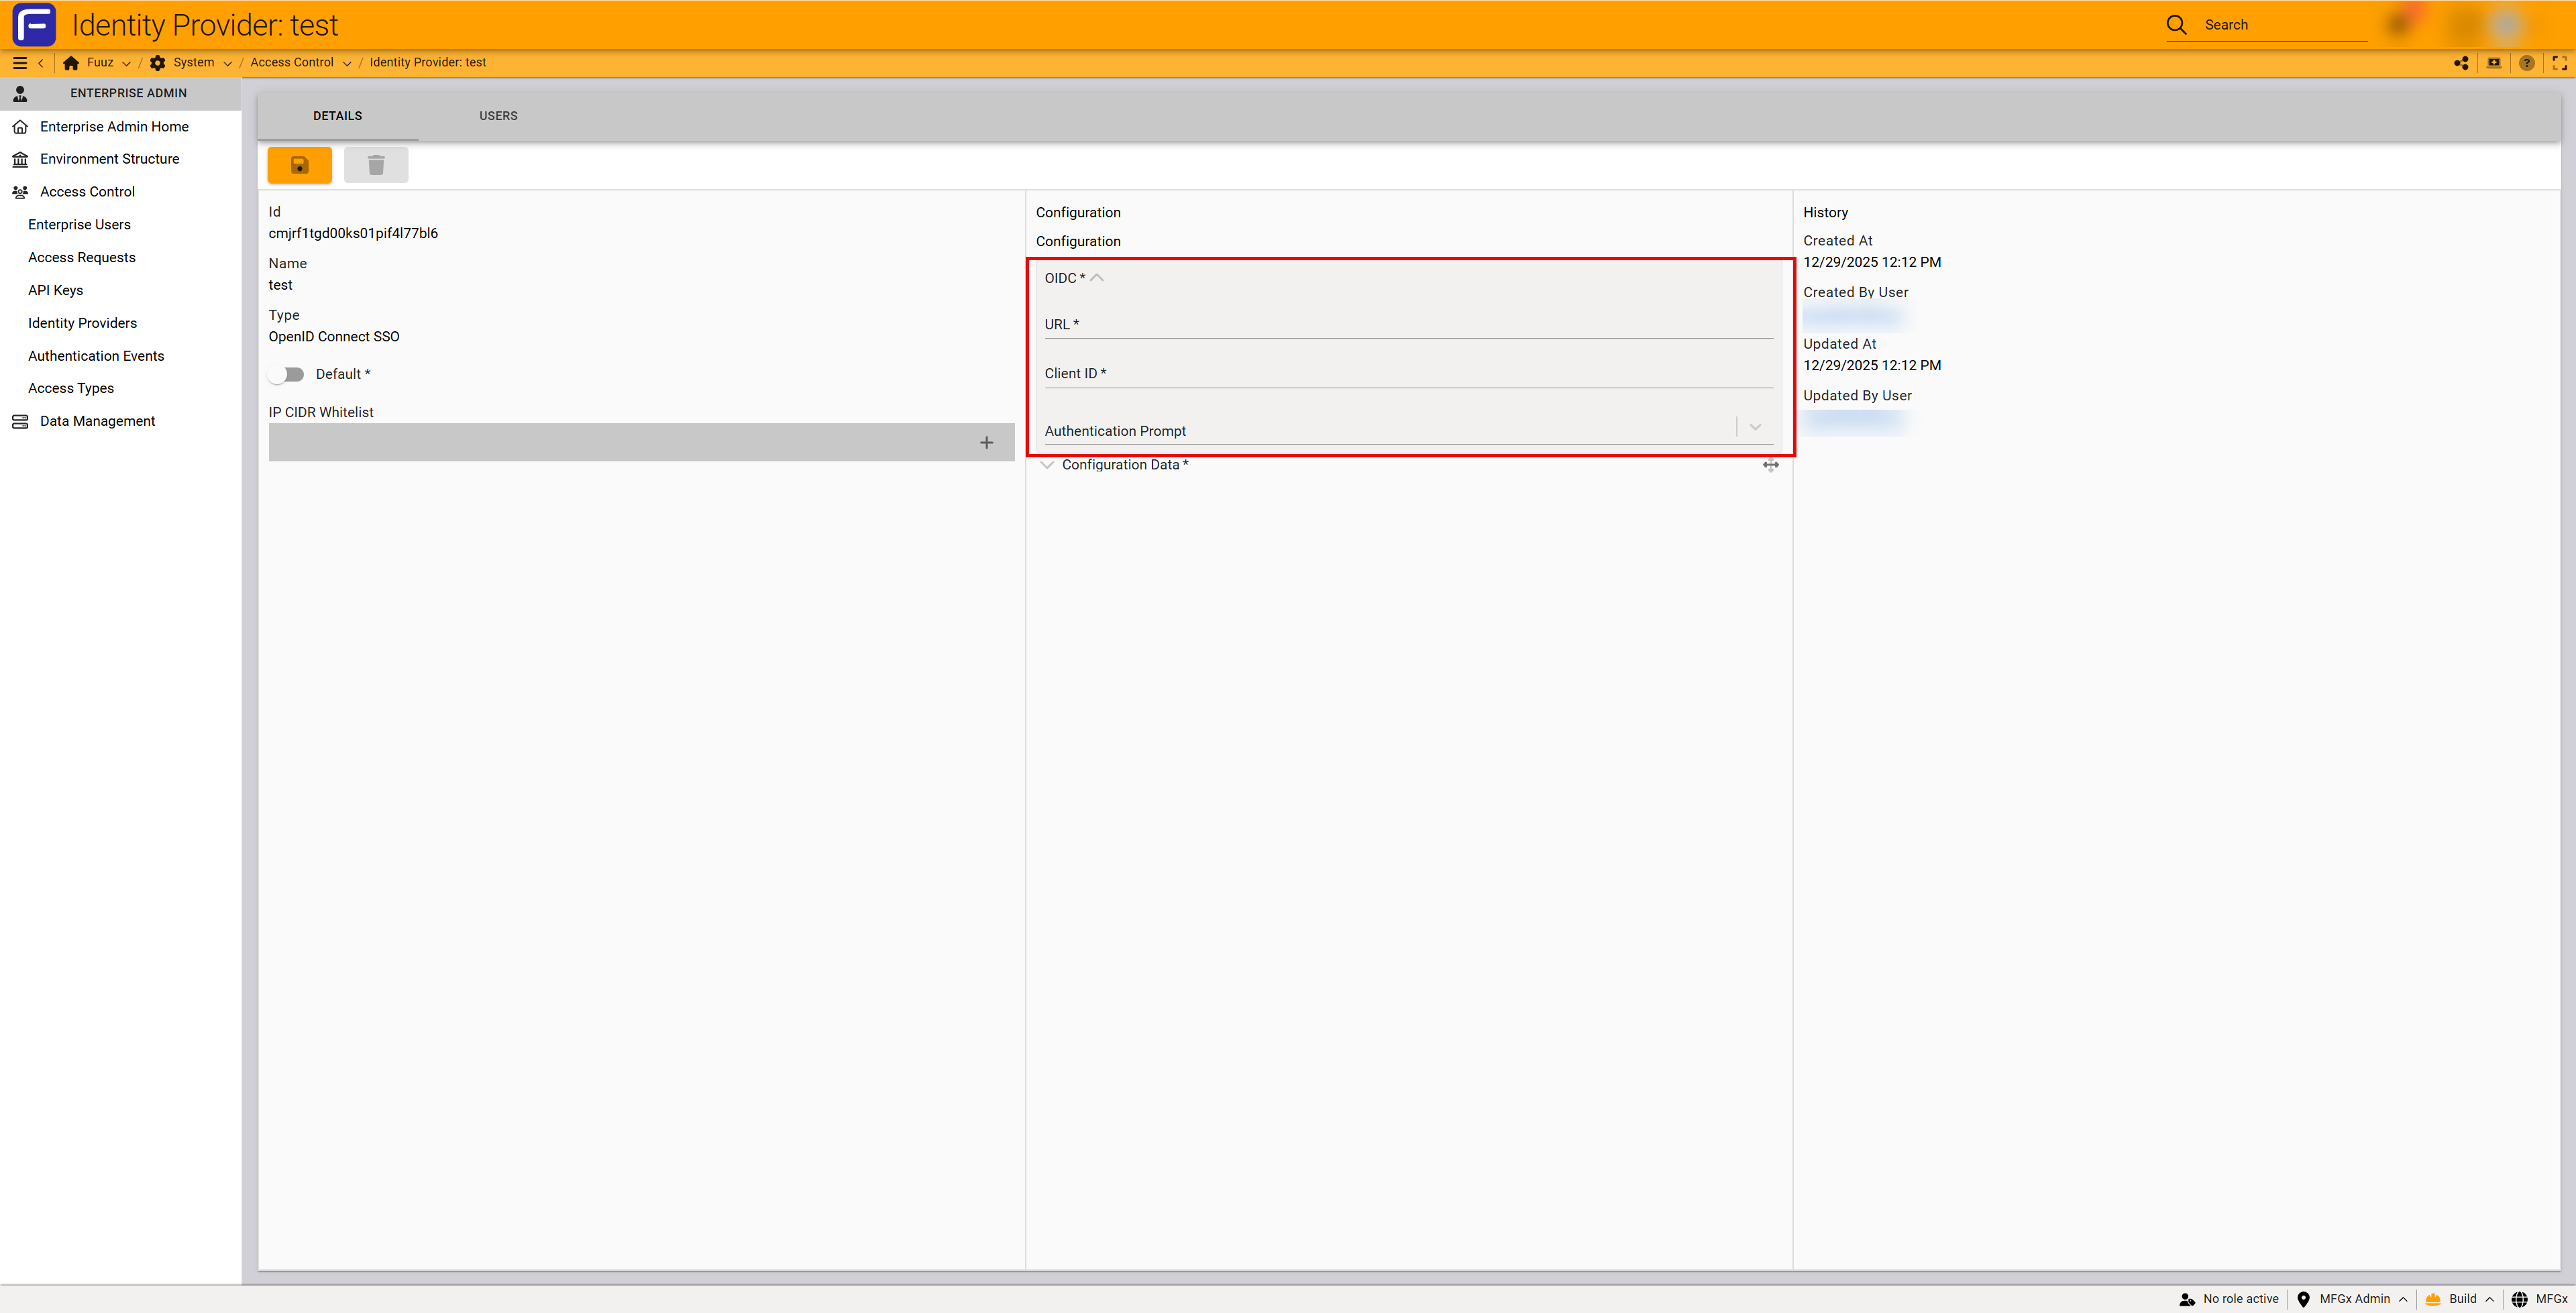
- Configure OIDC settings in the Configuration panel:
- URL: Format:
https://login.microsoftonline.com/[DirectoryID]/v2.0 - Client ID: Application (client) ID from Azure configuration
- Authentication Prompt: Select from dropdown: login (always prompt for credentials), consent (prompt for user consent), or select_account (let user choose account)
- URL: Format:
- Save changes

Step 3: Configuring Basic API Access Provider
Create a Basic API Access Identity Provider for specialized API integrations where standard API Key length is too long for the external system to accept.
- Navigate to
Enterprise Admin → Access Control → Identity Providers - Click + (Add) button
- Complete the Create a new Identity Provider form:
- Name: Descriptive name (e.g., "Legacy System API Access")
- Default: Leave unchecked (not typically default)
- Identity Provider Type: Select Basic API Access
- IP CIDR Whitelist: Add IP restrictions if needed (optional)
- Click + (Submit)
- Navigate to the newly created provider by clicking the Id field
- Configure password policy settings in the Configuration panel:
- Minimum Length: Set minimum password length; must be ≥ 32 characters
- Maximum Length: Set maximum password length; must be ≤ 256 characters
- Require Mixed Case: Force uppercase and lowercase characters
- Require Number: Force at least one numeric character
- Require Symbol: Force special characters
- Save changes
Critical: Users assigned to Basic API Access Identity Provider can ONLY access Fuuz APIs. They are not authorized to log into the frontend interface. Access is limited to the Home Tenant configured during user creation.
Step 4: Assigning Users to Identity Provider
Assign Enterprise Users to the appropriate Identity Provider during user creation or by converting existing users.
Option A: Assign During User Creation
- Navigate to
System → Access Control → Enterprise Users - Click + (Add) to create new user
- In Identity Provider field, select desired provider (defaults to Default IdP)
- Complete remaining user details and submit
Option B: Convert Existing User
- Navigate to
System → Access Control → Enterprise Users - Locate user and click the Email column to open user form
- Select Identity Providers tab
- Select existing Identity Provider
- Click Delete (trash can) button to disassociate current provider
- Click + (Create) button to associate new provider
- Select new Identity Provider from dropdown
- Submit
- Verify user receives new Account Created email with updated sign-in instructions
Option C: Manage from Identity Provider Interface
- Navigate to
Enterprise Admin → Access Control → Identity Providers - Select an Identity Provider by clicking the Id field
- Click the USERS tab
- View all users currently assigned to this Identity Provider
- Select a user to edit their Identity Provider assignment
Note: Converting users between Identity Providers is manual and must be done one-by-one. Plan Identity Provider strategy before creating large numbers of users to avoid conversion work.
Step 5: Configuring Multi-Factor Authentication (Internal IdP Only)
Enable two-factor authentication for Internal Identity Provider users. MFA settings only apply to Internal IdP, not OIDC or Basic API Access providers.
Option A: Users Configure Their Own MFA
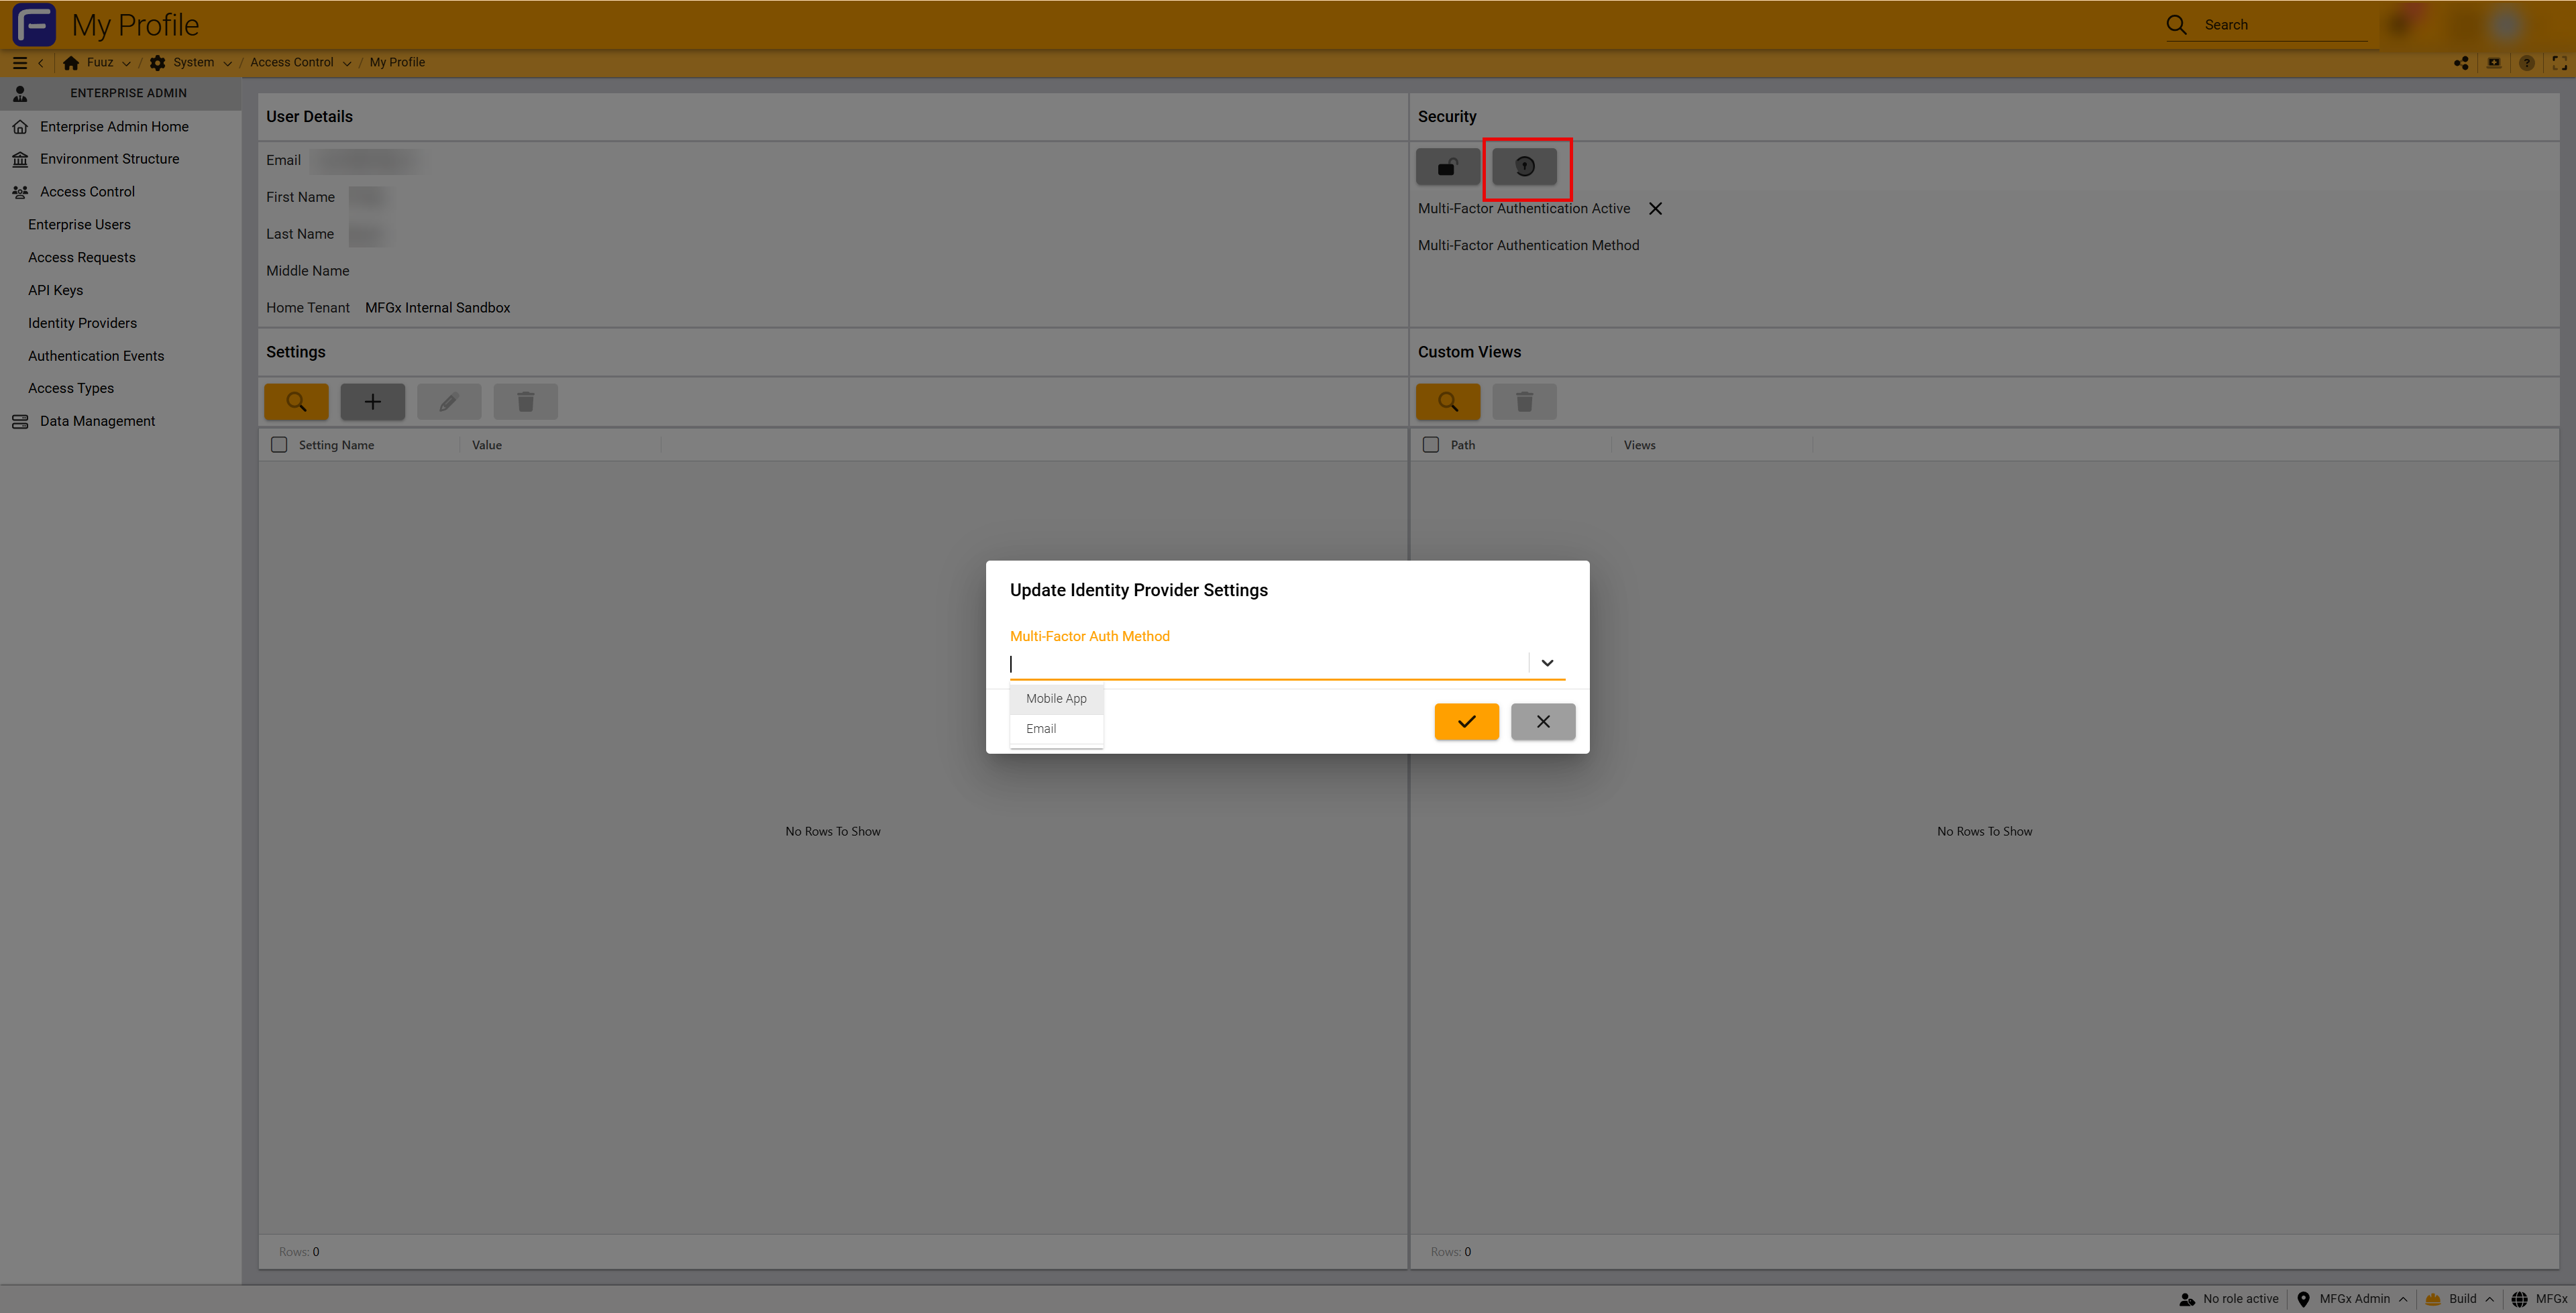
- User navigates to My Account in Fuuz
- Click Edit button in Security Settings section
- Select 2FA method:
- Email: Receive 6-digit code via email
- Mobile App: Use authenticator app (Authy, Google Authenticator, Microsoft Authenticator)
- For Mobile App, scan QR code or manually enter 32-digit code
- Save changes
Option B: Enterprise Admin Configures MFA via Identity Provider
- Navigate to
Enterprise Admin → Access Control → Identity Providers - Select Internal Identity Provider by clicking the Id field
- Navigate to USERS tab
- Select user to configure
- Click Edit
- Select 2FA method (recommend Email when configuring for other users)
- Save
Option C: Enterprise Admin Configures MFA via Enterprise Users
- Navigate to
System → Access Control → Enterprise Users - Locate user and click Email column to open user form
- Navigate to Identity Provider tab
- Select the Identity Provider
- Click Edit
- Select 2FA method
- Save
Important: When configuring Mobile App 2FA for other users, set to Email method instead. Mobile App requires the user to scan QR code or enter 32-digit code, which is displayed only once. Store the 32-digit code securely if needed later.
4. Configuration Reference
Identity Provider Fields
| Field | Description | Notes |
|---|---|---|
| Id | System-generated unique identifier | Click to open detail form |
| Name | Human-readable identifier | Use descriptive names |
| Default | Auto-selected when creating new users | Always have one default; can override during creation |
| Configuration | Type-specific authentication settings | Varies by IdP type; see tables below |
| Users | Count of Enterprise Users assigned to this IdP | Click to view USERS tab |
Internal IdP Configuration
| Setting | Default | Description |
|---|---|---|
| IP CIDR Whitelist | None | Restrict login by IP address or CIDR block; unlimited entries |
| Minimum Length | 8 | Minimum password length in characters |
| Maximum Length | Unlimited | Maximum password length in characters |
| Require Mixed Case | Unchecked | Force uppercase and lowercase characters |
| Require Number | Unchecked | Force at least one numeric character (0-9) |
| Require Symbol | Unchecked | Force at least one special character |
| Expires In Days | 90 | Password expiration period; 0 = never expires |
| Require Multi-Factor Authentication | Unchecked | Enable Email or Mobile App 2FA |
| Prevent Password Reuse | Unchecked | Block reusing recent passwords |
OIDC Configuration
| Field | Required | Description |
|---|---|---|
| URL | Yes | Identity provider endpoint URL; format varies by provider |
| Client ID | Yes | Application (client) ID from SSO provider configuration |
| Authentication Prompt | Yes | Options: login (always prompt), consent (request consent), select_account (choose account) |
Basic API Access Configuration
| Setting | Constraint | Description |
|---|---|---|
| Minimum Length | ≥ 32 characters | Minimum password length; must be at least 32 characters |
| Maximum Length | ≤ 256 characters | Maximum password length; cannot exceed 256 characters |
| Require Mixed Case | Optional | Force uppercase and lowercase characters |
| Require Number | Optional | Force at least one numeric character (0-9) |
| Require Symbol | Optional | Force at least one special character |
IP Restrictions
- Scope: Applied at Identity Provider level; all users of that IdP inherit restrictions
- Format: Individual IP addresses or CIDR blocks (e.g.,
192.168.1.100or10.0.0.0/24) - Quantity: Unlimited number of IP addresses or CIDR blocks
- Authentication Failure: Users authenticating from non-whitelisted IPs are immediately denied
- Layered Security: Works in conjunction with IP restrictions in Access Control Policies (IdP controls login; policies control screen/data access)
5. Validation & Testing
Success Criteria:
- ✓ Identity Providers configured with appropriate password policies and security settings
- ✓ For OIDC: External identity platform configured with correct redirect URI and ID token flow
- ✓ Test users successfully authenticate using each configured Identity Provider
- ✓ IP restrictions properly block authentication from non-whitelisted addresses
- ✓ MFA prompts when enabled; 6-digit codes validated correctly
- ✓ Password expiration triggers lockout; Enterprise Admin can reset
Testing Internal IdP
- Create test user assigned to Internal Identity Provider
- Verify user receives Account Created email
- User sets password meeting configured policy requirements
- User successfully logs into Fuuz
- If MFA enabled, verify 2FA prompt appears and 6-digit code validates
- Test password expiration by setting Expires In Days to 1 day; verify lockout after expiration
Testing OIDC IdP
- Create test user assigned to OIDC Identity Provider
- Navigate to Fuuz login page
- Enter user email and click Continue
- Verify redirect to external SSO provider
- Authenticate with SSO credentials
- Verify successful redirect back to Fuuz with user logged in
- Test logout using Sign out everywhere link to verify front-channel logout
Testing Basic API Access
- Create test user assigned to Basic API Access Identity Provider
- Verify user can authenticate via API using username/password
- Confirm user CANNOT log into Fuuz frontend
- Verify user can only access Home Tenant configured during creation
- Test password meets minimum 32 character requirement
Best Practices
- Strategic Planning: Design Identity Provider strategy before creating users to minimize manual conversion work
- Default IdP Selection: Set Internal as default; explicitly select OIDC for directory users during creation
- Password Policies: Align Internal IdP policies with corporate security standards
- IP Restrictions: Use for office locations with static IPs; avoid for remote workers with dynamic IPs
- MFA Configuration: Enable Email 2FA by default; allow users to opt into Mobile App 2FA
- Multiple IdPs: Create separate OIDC providers for different organizational divisions if different security policies required
- Documentation: Document which users should use which Identity Provider for consistent onboarding
6. Troubleshooting
| Problem | Cause | Solution |
|---|---|---|
| OIDC login redirects to error page | Incorrect redirect URI or ID tokens not enabled | Verify redirect URI matches Fuuz format; check ID Tokens checkbox in SSO provider |
| Azure error: response_type 'id_token' not enabled | ID Tokens box not checked in Azure | Navigate to Authentication page in Azure; check ID Tokens box; save |
| User email case sensitivity error | Azure AD users may be case sensitive | Ensure email entered in Fuuz matches exact case from Azure AD |
| User locked out after password expires | Password expired per IdP policy | Enterprise Admin resets password via Enterprise Users interface |
| MFA QR code not displayed again | QR code and 32-digit code displayed only once | Disable and re-enable MFA to generate new QR code; save 32-digit code securely |
| IP restriction blocking legitimate user | User IP not in whitelist | Add user's IP to IdP whitelist or create separate IdP without IP restrictions |
| Cannot delete Identity Provider | Users or authentication records associated | Convert all users to different IdP; IdP can be deleted when no users/records remain |
| Basic API Access user can't login to frontend | Basic API Access users cannot access frontend | By design; convert user to Internal or OIDC IdP for frontend access |
7. Revision History
| Version | Date | Editor | Description |
|---|---|---|---|
| 1.0 | 2025-12-29 | Fuuz Documentation Team | Initial Release |
See Also
Related Articles
Enterprise Users
Managing Enterprise Users Article Type: Concept / How-To Audience: Enterprise Administrators Module: Enterprise Admin - Enterprise Users Applies to Versions: Fuuz 2024.1+ 1. Overview Enterprise Users are the foundational user records in the Fuuz ...Enterprise Admin Overview
Article Type: Concept Audience: Enterprise Administrators, IT Management, Executive Sponsors Module: Enterprise Admin Applies to Versions: Fuuz 2024.1+ The Enterprise Admin interface represents the highest level of administrative control within the ...Managing Applications (Tenants)
Article Type: Concept / How-To Audience: Enterprise Administrators Module: Enterprise Admin - Environment Structure Applies to Versions: Fuuz 2024.1+ Applications (historically referred to as "Tenants") are modular software solutions deployed within ...Managing API Keys
Article Type: Configuration / How-To Audience: Enterprise Administrators Module: Access Control Applies to Versions: All Versions Estimated Time: 15-20 minutes API Keys provide secure, programmatic access to the Fuuz platform for external system ...Authentication Events
Article Type: Concept Audience: Enterprise Administrators Module: Enterprise Admin - Access Control Applies to Versions: All Versions 1. Overview The Authentication Events screen provides Enterprise Administrators with comprehensive visibility into ...